
I love to work with Hashicorp Vault in the cloud projects. It is a great solution for companies that do not want to lock themselves to Google or AWS cloud. It has strong features like dynamic passwords, secrets management, certificates, tokens, etc… Today I would delve into Hashicorp Certificate Authority project I recently built. I built 2 tier CA hierarchy project with the offline root Certificate Authority server, that is considered a classical by-the-book solution.
Some theoretical information
Certificate Authority is in charge to generate and revoke service/user/application certificates. It is a part of PKI – Public Key Infrastructure infrastructure. For example, when you surf the Internet and the website address starts with https, it means the website has an SSL certificate installed and all communication is encrypted. This SSL certificate is generated by Certificate Authority.
Another popular use-case is if you are building a company cloud. One of the methods to raise the overall security level is to make sure that all the traffic is encrypted between all servers involved. You can purchase SSL certificates for all your application servers or add CA – Certificate Authority server in your infrastructure and use it to generate certificates for your application servers.
How does certificate signing work?
The certificate signing works as following:
- Alice generates a Certificate Signing Request (CSR) and sends it to the CA server.
- CA server validates the request and signs it with its the private key and sends back to the user.
- Alice can now install the SSL certificate for example in Nginx for her website.
How validation is made?
- Bob opens the website in the browser.
- The browser receives the encrypted page.
- Browser extracts website public key from the page.
- Browser checks that certificate is signed by known CA authority.
- If yes, continue opening the pages, otherwise warning to the user.
Certificate Authority Hierarchy
Certificate Authority is another server in your infrastructure. In theory, it can be hacked. It is a real threat. To minimize the affected of the hacked CA server, another higher-level CA server is used. This higher-level CA server is called a root CA and it is recommended to keep offline. The online CA server is hacked, you rebuild it and generate a new certificate for it using the offline CA server you have.
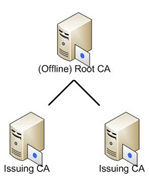
In some case, when even higher security is needed you can implement another layer and build 3 tier CA deployment solution. Here is an excellent article about that.
Setup Root CA
I use cfssl application to generate a root certificate out of the template.
Create certificate root template ./root-template.json
{
     "CN": "Company Root CA",
     "key": {
         "algo": "rsa",
         "size": 2048
     },
     "names": [{
         "C": "IL",
         "L": "Tel-Aviv",
         "O": "Company",
         "OU": "Cloud",
         "ST": "Hamerkaz"
     }]
 }
Next, I use the following command:
mkdir -p /tmp/certs/
cfssl genkey -initca ./root-template.json | cfssljson -bare /tmp/certs/root-cert
All certificates are saved into /tmp/certs/root-cert directory. 3 files will be created:
- /tmp/certs/root-cert.pem – public certificate – used in the certificate chain.
- /tmp/certs/root-cert.csr – certificate signing request
- /tmp/certs/root-cert-key.pem – certificate private key – to be saved offline
Configure Hashicorp Vault CA
I suppose you have already Hashicorp Vault server already installed in your cloud. I will configure it to be certificate Issuing CA.
The next script will do the following:
- Enable PKI service
- Configure Certificate Authority.
- Generate Certificate Signing Request from the CA server itself and export it to a file: /tmp/issuing-ca.csr
VAULT_TOKEN="XXXXXXXXXXXXXXXXX"
VAULT_ADDR="http://XXX.XXX.XXX.XXX:8200"
VAULT_DOMAIN="ca.your-company.com"

# enable pki service in vault under /pki
curl --silent --header "X-Vault-Token: "$VAULT_TOKEN \
  --request POST --data '{"type":"pki"}' \
  $VAULT_ADDR/v1/sys/mounts/pki
# configure
curl --silent --header "X-Vault-Token: "$VAULT_TOKEN \
  --request POST --data '{"max_lease_ttl":"87600h"}' \
  $VAULT_ADDR/v1/sys/mounts/pki/tune || true
curl --silent --header "X-Vault-Token: "$VAULT_TOKEN \
  --request POST --data '{"common_name":"'$VAULT_DOMAIN'","ttl":"26280h"}' \
  $VAULT_ADDR/v1/pki/intermediate/generate/internal \
  | jq -r '.data.csr' > /tmp/issuing-ca.csr
curl --silent --header "X-Vault-Token: "$VAULT_TOKEN \
  --request POST --data '{"issuing_certificates":"http://'$VAULT_DOMAIN':8200/v1/pki/ca","crl_distribution_points":"http://'$VAULT_DOMAIN':8200/v1/pki/crl"}' \
  $VAULT_ADDR/v1/pki/config/urls || true
Now you need to sign on the Issuing CA certificate request /tmp/issuing-ca.csr with the root CA server private key. After that, you can take the root CA private key offline.
Prepare a signing configuration file ./signing-config.json :
{
    "signing": {
        "default": {
            "expiry": "43800h",
            "usages": ["signing", "key encipherment", "cert sign", "crl sign"],
            "ca_constraint": {"is_ca": true}
        }
    }
}
Run the following commands to sign CSR:
# sign certificate with root certificate
cfssl sign -ca /tmp/certs/root-cert.pem \
   -ca-key /tmp/certs/root-cert-key.pem \
   -hostname $VAULT_DOMAIN -config ./signing-config.json \
   /tmp/issuing-ca.csr | sed -E 's/cert/certificate/' \
   > /tmp/issuing.pem
# upload signed to Vault
curl --silent --header "X-Vault-Token: "$VAULT_TOKEN \
  --request POST --data @/tmp/issuing.pem \
  $VAULT_ADDR/v1/pki/intermediate/set-signed
Vault CA now is configured to be issuing CA in the CA hierarchy.
Next, you need to create a role to be able to generate certificates for your domain:
VAULT_ALLOWED_DOMAIN="company.com"

curl --silent --header "X-Vault-Token: "$VAULT_TOKEN \
  --request POST --data '{"allowed_domains":"'$VAULT_ALLOWED_DOMAIN'","allow_subdomains":true,"max_ttl":"720h"}' \
  $VAULT_ADDR/v1/pki/roles/generate-cert-role || true
An optional step is to create a custom policy and account to use only to generate certificates.
Finally, generating a certificate.
DOMAIN_NAME="mysql1.company.com"

curl --silent --header "X-Vault-Token: "$VAULT_TOKEN \
  --request POST --data '{"common_name":"'$DOMAIN_NAME'"}' \
  $VAULT_ADDR/v1/pki/issue/generate-cert-role
Generate certificate, will generate:
- private key
- public key
- certificate chain / ca_chain comprising of the public key of issuing CA. By default, it will include only 1 certificate same as issuing_ca. When uploading certificate data to the application, you will need to add certificate – a public key of root CA server to the certificate chain, so the applications will trust the certificate.
Here is an example of JSON you will get:
{
   "request_id": "3bb27407-XXXX-XXXX-XXXX-873e259cf257",
   "lease_id": "",
   "renewable": false,
   "lease_duration": 0,
   "data": {
     "ca_chain": [
       "-----BEGIN CERTIFICATE-----XXXXX\n-----END CERTIFICATE-----"
     ],
     "certificate": "-----BEGIN CERTIFICATE-----\nYY\n-----END CERTIFICATE-----",
     "expiration": 1568655291,
     "issuing_ca": "-----BEGIN CERTIFICATE-----\nXXXX\n-----END CERTIFICATE-----",
     "private_key": "-----BEGIN RSA PRIVATE KEY-----\nP\n-----END RSA PRIVATE KEY-----",
     "private_key_type": "rsa",
     "serial_number": "67:fb:xx:xx:xx:xx:xx"
   },
   "wrap_info": null,
   "warnings": null,
   "auth": null
 }
Now you need to extract private_key, ca_chain (and add public cert of root certificate to it) and, certificate.
Hope this solution helps you. leave your comments.
I LOVE FEEDBACK 🙂